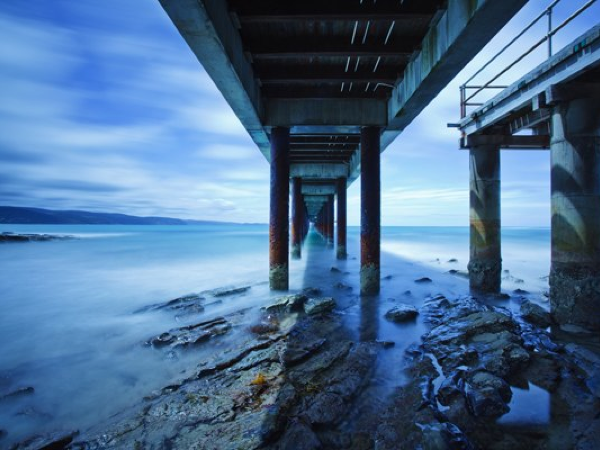
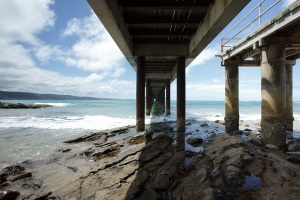
Lorne Pier
A Guide to using the Lee 10 Stop ND Filter Hi, in this post I want to show you the Lee 10 stopper ND (Neutral Density) Filter. I will show you how to use it and some of the amazing effects it can create. What the filter does is block out light which increases our shutter speed, it increases it by 10 stops of light so we can get very long exposures during the day, normally we would have to shoot at dusk or first light to get these long exposures. Not any more, so a fantastic filter to use when visiting places and don’t have the luxury of waiting for low light. The main effect it has is to smooth out water and creates really nice skys, it is amazing how much cloud moves in a couple of minutes 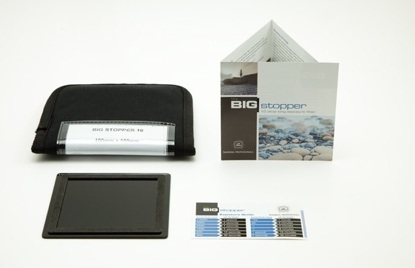
What you get - The filter comes in a nice sturdy pouch, some instructions and a very handy chart for calculating your exposure times NB the filter is edged with felt on one side.
So first lets look at the filter and how we attach it to the camera. Read here an earlier post on the Lee Filter system 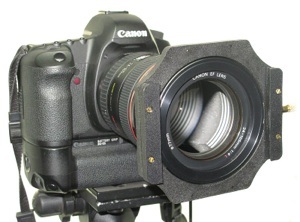
First a ring is screwed onto the lens and then the holder is attached to the ring, the 10 Stopper can now slide into the holder, you can stack filters as well, so you may want to slide in the 10 stopper and also use a Graduated ND to help pull the sky down. If you do use more than one filter the 10 stopper must go closest to the lens. One side of the filter has felt edging and this must always face the camera side. It creates a light seal and if you have it the wrong way you get weird edges to your images, good if you want that retro 60’s look. Here are a few things that you will need to know when using this filter and then a step by step guide, it is a real process that needs to be followed. As you will be using long exposures you will need to set your camera to Bulb if your shutter speed exceeds the longest available on your camera (most are 30 sec) For long exposures a cable release is ideal, one that sets a long exposure ( 1-4 mins is common when using this filter) The filter dosn’t throw a colour cast but DOES alter the colours, best to shoot in Raw and adjust colour balance latter if need be. If your camera has long exposure noise reduction, turn it off as it doubles the time to process an image, hence a 3 minute exposure takes 6 minutes before you see the histogram. If you plan on taking a lot of shots then make sure your camera battery is fully charged, long exposures are quite a drain on the battery. I found taking the whole holder and filter off while composing shots was easier than sliding the filter in and out, just make sure you have a safe spot in your camera bag to place it while you re-set your shot. And here is a step by step guide for making an image.
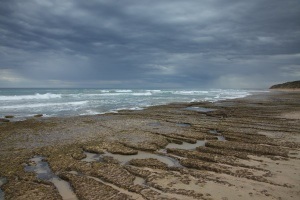
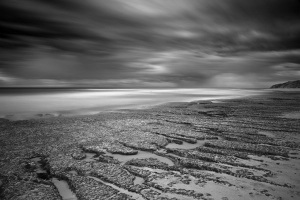
That's about it, you may find as I did that your filter could be more or less than 10 stops, mine is closer to 11. And here are some before and after shots to give you an idea of the effects we can get. 

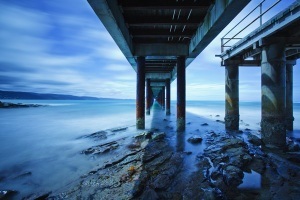
Conclusion Although this filter is quite expensive, it is a really handy one to have. There are cheaper circular ones that screw on but that would drive me mad screwing the thing on and off all the time between shots and setting shots up. I also like this system as I can add a grad filter. In the last image there of Lorne Pier I used a soft grad as well, I spun it sideways to lessen the exposure on the left hand side of the image, certainly helped. I think this may be a look that I tire with but for the mean time its a bit of fun and I find myself looking at daytime scenes differently. Please feel free to comment or ask questions. Dean Workshops
I have a couple of workshops that cover filters. Sensational Seascapes - Merimbula NSW, 3 day workshop May 17-20, 2013, click here for details Controlling and Understanding Light - Day Workshop Sunday June 2nd, 1.30pm - 5.30pm Sunday Nov 24th, 1.30pm - 5.30pm
0 Comments
Your comment will be posted after it is approved.
Leave a Reply. |

 RSS Feed